iOS 9 (Beta) is here for some time full of new great features for all kind of developers - game or business apps developers.
One of the biggest and greatest enhancements that arrived in iOS 9 (if not the biggest!) undisputedly is the deep-linking capabilities now open to the developers. Using the Spotlight search, your end-users can now search the contents of your app even if your app is not installed on their devices, granted that other users are already your app and browse the same content. Or, you can set some of the app contents to be private and available in the search only for the respective users. Apple has recently released a pretty comprehensive guide on the available search APIs which also gives a few great examples on the possible search APIs usages.
Of course, these APIs are available in NativeScript, and today we are going to implement a NativeScript app that provides deep-linking capabilities.
I would like to show you how to use two of the possible APIs to expose your app content to the Spotlight search. The app will be a simple Services app that offers Hotel services and Car services. From the Hotels page we will be able to navigate to the details page of specific hotel. Again from the Hotels page, we will have a button to mark a hotel as our a favorite one.
Thanks to the first API, known as User Activity, we will expose the main navigation points of the app - the Hotels page and the Cars page - to the Spotlight search. As you will see later, these points would potentially be available to users that do not have the app installed, assuming that there are already users visiting these navigation points.
Thanks to the second API, known as Core Spotlight, we will take the hotels which the end-user has marked as favorite and will expose them to the Spotlight search, so that he can have an easy access to his favorite accommodation facilities.
To be able to follow this article, you should use the latest and greatest versions of NativeScript and its iOS Runtime. Here is how to check the version of NativeScript using terminal on a Mac:
tns --version //should return 1.2.3 or 1.2.4
NOTE: The “tns” command is a shortcut for typing “nativescript.” In this post, I’ll use “tns,” but you could also use “nativescript” to get the same results
Supposing that you have run the tns platform add ios command to add the platform-specific ios files to the project, the package.json file in the main directory of the app should state 1.2.2 for the NativeScript iOS Runtime:
"tns-ios": {
"version": "1.2.2"
}
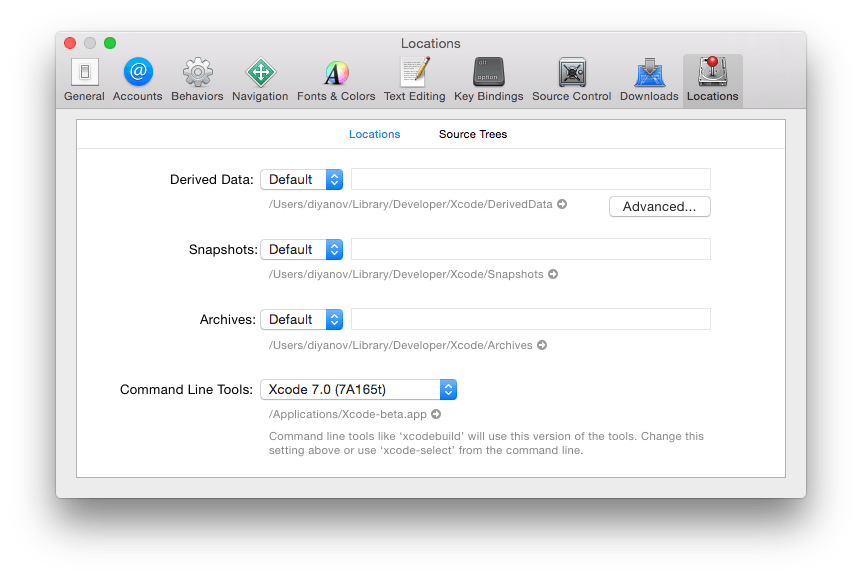
We also need to make sure that the NativeScript CLI is building the apps using iOS9 and Xcode 7 (Beta) command line tools. To do so, launch Xcode 7 or Xcode 6 (either will work), and then from the top menu, go to Xcode >> Preferences. From the Preferences window, select the Locations tab and from the Command Line Tools dropdown select the Xcode 7.0 option.
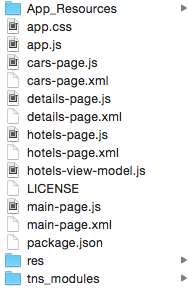
Following the app description above, we have an app with main-page.js/xml, cars-page.js/xml, hotels-page.js/xml and details-page.js/xml. We have some data for the hotels too that will be kept in a hotels-view-model.js file.
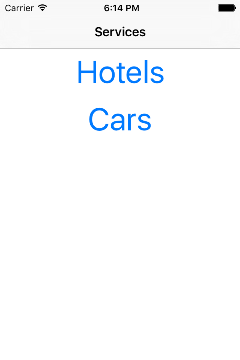
To keep things simple, focusing on the deep-linking capabilities, here is how the pages would look:
|

|

|

|
As you can see, upon opening the app we get the main-page opened, and using the buttons, we can navigate to the Cars or Hotels sections. From the Hotels page we can tap on a hotel item that leads us to its details page. And, on the Hotels page, you can notice that there is an "Add" button for each hotel item that makes this hotel our favorite.
Let’s now dive into the implementation.
In this section, we will create two User Activities for the two main navigation points of our app - the Hotels page and the Cars page. If browsed by enough end-users, these user activities will be available as search results in Spotlight even if the app is not installed on sb’s device.
ImagesBefore digging into code, we need to add a few images that will appear as thumbnails for our User Activities search results. As advised by the Apple documentation, for one Spotlight item we need two images - one 40x40 and one 80x80.
And here they are, the images for the Hotels and Cars items:
 |
 |
 |
 |
Ok, ok, I admit it, I am not Picasso, nor Gogh, but for our demo purposes, the images would do the job. :)
As advised by the NativeScript documentation, let’s add the images as resources to the project. This means:
Putting them in the [your project name]\app\App_Resources\iOS folder
Implementation
Further, assuming that we attached to the loaded event of the Cars page using pageLoaded event handler using the following simple xml:
<Page style="background-color: white;" xmlns="http://www.nativescript.org/tns.xsd" loaded="pageLoaded">
<StackLayout>
<Label text="Cars" cssClass="title"/>
</StackLayout>
</Page>
function pageLoaded(args) {
frameModule.topmost().ios.navBarVisibility = "always";
var page = args.object;
page.ios.title = "Cars";
var carsImg = imageSourceModule.fromResource("cars").ios;
var carsData = UIImagePNGRepresentation(carsImg);
var carsImgData = NSData.dataWithData(carsData);
var carsAttributeSet = CSSearchableItemAttributeSet.alloc().initWithItemContentType(kUTTypeItem);
carsAttributeSet.title = "Cars";
carsAttributeSet.contentDescription = "Rent your car now and drive!";
carsAttributeSet.keywords = ["rent-a-car", "car", "rent", "vehicle"];
carsAttributeSet.thumbnailData = carsImgData;
var activity = NSUserActivity.alloc().initWithActivityType("com.myCompany.services");
activity.title = "Cars";
activity.userInfo = {[ {"id": "carsID"} ]};
activity.contentAttributeSet = carsAttributeSet;
activity.eligibleForSearch = true;
activity.eligibleForPublicIndexing = true;
activity.becomeCurrent();
}
In the very first part of the User Activity implementation here, we getting the appropriate images from the resources and we are preparing it for consumption by the User Activity item using a few native methods:
var carsImg = imageSourceModule.fromResource("cars").ios;
var carsData = UIImagePNGRepresentation(carsImg);
var carsImgData = NSData.dataWithData(carsData);
In the next part, we are preparing the CSSearchableItemAttributeSet which plays a vital role in how the item will appear in the search results. As you can see below, we are setting the title, description, the keywords and the thumbnail image. The kUTTypeItem is a special constant type that defines how the item would appear in the Spotlight search results. For more information about the available constants, you can refer to the Apple documentation:
var carsAttributeSet = CSSearchableItemAttributeSet.alloc().initWithItemContentType(kUTTypeItem);
carsAttributeSet.title = "Cars";
carsAttributeSet.contentDescription = "Rent your car now and drive!";
carsAttributeSet.keywords = ["rent-a-car", "car", "rent", "vehicle"];
carsAttributeSet.thumbnailData = carsImgData;
Last is the User Activity item itself. We are setting its type - kind of identifier, the title, the user info, which again is yet another identifier and also we are associating that User Activity with the CSSearchableItemAttributeSet. Following are two important properties. eligibleForSearch allows that User Activity to appear in the Spotlight search results at all, and eligibleForPublicIndexing allows that User Activity to appear in the Spotlight search results of end-users who don’t have the app installed. Note that in order for that to happen, the User Activity should have received a great amount of interest by other users who have the app installed. Last, but not least, we should call the becomeCurrent method to submit the activity to the Spotlight index:
var activity = NSUserActivity.alloc().initWithActivityType("com.myCompany.services");
activity.title = "Cars";
activity.userInfo = {[ {"id": "carsID"} ]};
activity.contentAttributeSet = carsAttributeSet;
activity.eligibleForSearch = true;
activity.eligibleForPublicIndexing = true;
activity.becomeCurrent();
Almost the same is the code for the Hotels User Activity, but of course with the appropriate keywords, title, description, etc:
function pageLoaded(args) {
var page = args.object;
page.bindingContext = model;
frameModule.topmost().ios.navBarVisibility = "always";
var page = args.object;
page.ios.title = "Hotels";
var hotelsImg = imageSourceModule.fromResource("hotels").ios;
var hotelsData = UIImagePNGRepresentation(hotelsImg);
var hotelsImgData = NSData.dataWithData(hotelsData);
var hotelsAttributeSet = CSSearchableItemAttributeSet.alloc().initWithItemContentType(kUTTypeItem);
hotelsAttributeSet.title = "Hotels";
hotelsAttributeSet.contentDescription = "Book your room now!";
hotelsAttributeSet.keywords = ["accommodation", "hotel", "book", "checkin"];
hotelsAttributeSet.thumbnailData = hotelsImgData;
var activity = NSUserActivity.alloc().initWithActivityType("com.myCompany.services");
activity.title = "Hotels";
activity.userInfo = { "id": "hotelsID" };
activity.contentAttributeSet = hotelsAttributeSet;
activity.eligibleForSearch = true;
activity.eligibleForPublicIndexing = true;
activity.becomeCurrent();
}
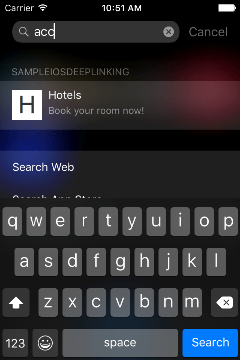
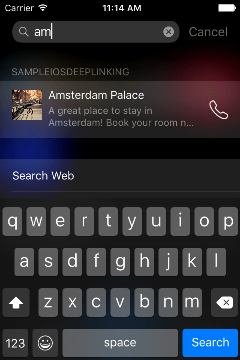
Here is the result if we search for “acc” for "accommodation":
As I discussed above, at the Hotels page you are given a list of hotels and by tapping a hotel from that list, you are navigated to a page with more details about it. At the Hotels page again, you have a “add to favourites” button for each hotel item. We will do not persist the ‘favourite’ state for simplicity purposes, but when we tap that button, the corresponding hotel will get added to the Spotlight search results, so that we have a nice clean shortcut for that hotel. Assuming that we handled the tap event of that button, here is what the implementation looks like:
function favButtonTap(args) {
var hotelItem = args.object.bindingContext;
var hotelImg = hotelItem.hotelImage.ios
var hotelMidImgData = UIImagePNGRepresentation(hotelImg);
var hotelImgData = NSData.dataWithData(hotelMidImgData);
var defaultSearchableIndex = CSSearchableIndex.defaultSearchableIndex();
var hotelAttributeSet = CSSearchableItemAttributeSet.alloc().initWithItemContentType(kUTTypeContact);
// Set properties that describe attributes of the item such as title, description, and image.
hotelAttributeSet.title = hotelItem.hotelText;
hotelAttributeSet.contentDescription = hotelItem.hotelDescription + " Book your room now!";
hotelAttributeSet.keywords = ["accommodation", "hotel", "book", "checkin", hotelItem.hotelText, hotelItem.hotelDescription];
hotelAttributeSet.thumbnailData = hotelImgData;
hotelAttributeSet.supportsPhoneCall = 1;
hotelAttributeSet.phoneNumbers = [hotelItem.hotelPhoneNumber];
// Create a searchable item, specifying its ID, associated domain, and the attribute set you created earlier.
var hotelCSItem = CSSearchableItem.alloc().initWithUniqueIdentifierDomainIdentifierAttributeSet(hotelItem.id, "org.NativeScript.Deeplinking", hotelAttributeSet);
// Index the item.
defaultSearchableIndex.indexSearchableItemsCompletionHandler([hotelCSItem], function (error) {} );
}
The ListView is creating a bindingContext for each item, and we benefit from this to easily populate the CSSearchableItemAttributeSet with data specific to the ‘favorite’ hotel - title, description, image. This time you can notice that we are setting two new properties to the attribute set: supportsPhoneCall and phoneNumbers. They will allow us to directly call the hotel of interest right from the Spotlight search results as shown in the figure below:
First, I need to tell a few words about the application module that resides in the tns_modules folder. This module contains vital for the application lifecycle methods that are called as the app is run/suspended/resumed etc. For the iOS platform specifically, you can find that module at [your project folder]\app\tns_modules\application\application.ios.js
With the introduction of the handoff API in iOS8, Apple introduced a method that is called as the app is started using the Spotlight search or when you continue an activity from one device to another. This method is named applicationContinueUserActivityRestorationHandler . We will add its definition to the NativeScript application module with the v1.3 release (coming in September/October). For now, you can manually include it in the application.ios.js file among the other methods like this:
TNSAppDelegate.prototype.applicationContinueUserActivityRestorationHandler = function (application, userActivity, restorationHandler) {
exports.notify({ eventName: "applicationContinueUserActivityRestorationHandler", object: this, application: application, userActivity: userActivity, restorationHandler: restorationHandler });
};
As you can notice, we are exporting an event that will be fired when the method is called. This will allow us to handle the event in the app.js file. And here is how to do it:
application.addEventListener("applicationContinueUserActivityRestorationHandler", function(args) {
console.log("Restoring the app to navigate to a page");
var userActivity = args.userActivity;
var frameModule = require("ui/frame");
var topMost = frameModule.topmost();
if (userActivity.activityType == "com.myCompany.services") {
if (userActivity.userInfo.objectForKey("id") == "hotelsID") {
topMost.navigate({
moduleName: "hotels-page"
});
}
else if (userActivity.userInfo.objectForKey("id") == "carsID") {
topMost.navigate({
moduleName: "cars-page"
});
}
}
if (userActivity.activityType == CSSearchableItemActionType) {
var uniqueIdentifier = userActivity.userInfo.objectForKey(CSSearchableItemActivityIdentifier);
for (i = 0; i<model.hotels.length;i++) {
if (uniqueIdentifier == model.hotels.getItem(i).id) {
topMost.navigate({
moduleName: "details-page",
context: model.hotels.getItem(i)
});
}
}
};
return true;
});
As you can see above, we are checking the type and id of the activities (tapped Spotlight items) that called the restoration handler and depending on what they are, we are navigating to the appropriate page - either to the Hotels/Cars pages or to the details page loaded with information about a specific hotel.
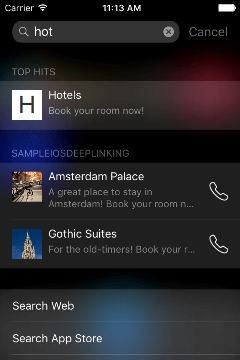
We are ready to rock’n’roll. Run the tns run ios --emulator command and normally the application will open (which will add our Spotlight items to the global Spotlight index). Press CMD + SHIFT + H, to put the app in the background or to kill it and then draw the screen from top to bottom to fire the Spotlight search. Type “hot” and you should get this screen with results from the indexed User Activities and Core Spotlight items:
Such a powerful feature for using each and every aspect of your app, even if it’s a complex one. Feel free to add deep-linking capabilities to your NativeScript app and let us know what you have achieved.
Get the complete source code of the demo app at GitHub.
Happy coding!